The author, Carlo Vialu, PT, MBA, is co-creator of SeekFreaks. He loves promoting function and participation for children and youth with disabilities, from our assessment to our interventions. Visit Apply EBP’s webinars on various assessment tools. More info after this article.

Everything’s Measurable! 
Segmental Assessment of Trunk Control 
Teletherapy Assessment Tools
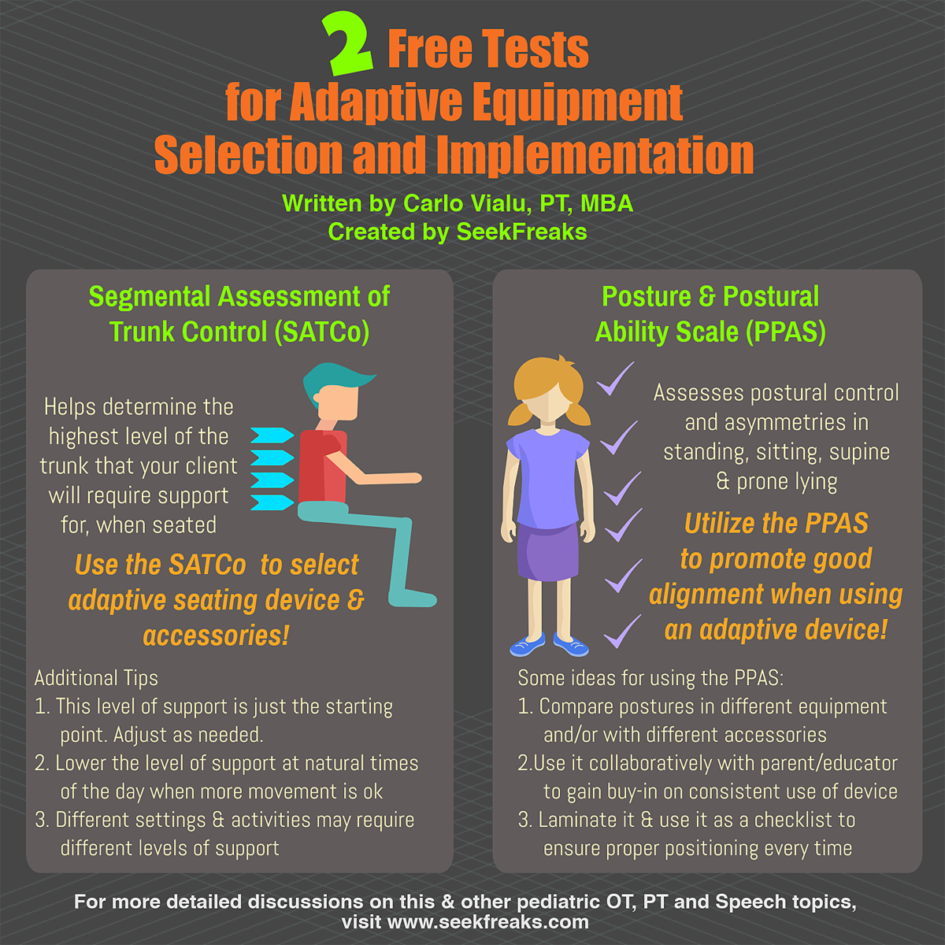
Ever wondered what features of an adaptive seating your client needs? There are so many accessories to choose from! Or wondered how you can monitor proper use of an equipment?
As you may have heard me say before “Everything’s Measurable!”
Assessment tools have so many more uses than just determining a client’s current level of function or impairment, or whether they need our services. In this article, I will cover 2 of my favorite tools that will help you with selecting proper assistive device features, and monitoring the use of such assistive device. As an added bonus, both of these tools are free!
Let’s get to them right away…
Segmental Assessment of Trunk Control (SATCo)
Personnel Needed
- 2 persons: 1 person behind the client to support the trunk and another person in front of the client to instruct the client and encourage the client to look at and reach for target toy or object
Materials Needed
- Test Form: Click here for the test form and instructions.
- Bench with Y-strap: The one big thing to do before conducting the SATCo is to build in 3 straps (in the form of a Y, one in front and 2 in the back) to a height adjustable bench (see instructions for photos of the bench). The 3 straps will be used to
- Toy or any object that will get the client’s attention during testing
From the Work of
Technical Definition: The Segmental Assessment of Trunk Control (SATCo) is an assessment tool that allows “close definition of the level at which trunk control difficulties present and leads to a ‘level by level’ treatment to the development of trunk control.” (Butler et al, 2010)
A Practical Application: When recommending and implementing an adaptive seating device, the SATCO can help you determine the highest level of the trunk the client will require support for. How? Follow on below…
Download the instructions via the link above. Skim it. When you have done this, continue on below…
The SATCo looks at whether the child will have difficulty maintaining sitting balance (e.g.,, loses trunk alignment, uses hand support or uses other compensatory strategies while sitting still, turning head with arms lifted or nudged) at very specific levels of trunk support. As you have seen in the test form, there are 7 levels of support, starting with the:
- Shoulder girdle
- Axillae
- Inferior scapula
- Over lower ribs
- Below ribs, pelvis
- No support provided (not even the Y-strap)
In testing, you would usually start from the highest level (shoulder) then go down one level at a time. By doing so, you are trying to “determine the highest level at which subject demonstrates lost of control.” (Butler et al, 2010)
Let’s say, you noted that the client started losing their balance when support is “over lower ribs” (and gets worse as you go lower), you can then use your clinical reasoning that: for this child to be able to maintain their balance and use their arms productively in class, at mealtimes, or other functional activities, they will need support at least one level above this, which, in this example, will be the “inferior scapula.”
In effect, SATCo’s specificity of the level at which they would require support would help you provide the client with the Goldilocks’ just the right amount of support. There are many benefits to this, and I list a few here:
- The client will be able to function better without being strapped in, literally, with support they do not require
- The client will not get used to too much support
- The funding source (be it a clinic, school, family, insurance or others) will not have to spend money on devices or accessories the client does not need
- Time savings on looking for (where did I place that again?), installing and adjusting accessories the client does not need
- Space to keep those accessories organized and easy to find
Additional tips:
- This level of support is just the starting point!
- Once you provided, say lateral supports at the inferior scapula level, try it out with the client participating in real life activities such as lunch, or tabletop classroom activities.
- Make sure the client is able to move around easily. If needed, adjust the support to ensure not just proper alignment but also the ability to function and participate in the activity.
- Give naturally-occurring opportunities for practice by lowering the level of support.
- If you think the client has the ability to improve their trunk control, lower the support at natural times of the day when more movement is ok. In our example above, we can lower the level of support to “over lower ribs” during art class, or while listening to dance music.
- Limit the amount of time that you provide less support. You don’t want it to be too tiring, that the client is too exhausted to participate in current, or later activities. Start with a few minutes, then increase the time as the client builds up the endurance.
- Different settings and activities may require different levels of support. Observe the client’s use of adaptive equipment in each of these settings.
My final words about the SATCo: while the testing sound simple, you would like to make sure that you test correctly. So read the article and the instructions carefully. The instruction is fairly detailed in describing what constitutes difficulties in controlling the trunk, and common mistakes when testing.
Posture and Postural Ability Scale (PPAS)
Personnel Needed for Testing
- One. Yes – just you! But this is a great collaboration tool (read more about this below).
Materials Needed
- Testing form which you can create based on the items in this article – see Table 1
- Whatever equipment the client uses for sitting, standing, lying in supine or prone
From the works of
- Rodby-Bousquet, E., Persson-Bunke, M., & Czuba, T. (2016). Psychometric evaluation of the Posture and Postural Ability Scale for children with cerebral palsy. Clinical rehabilitation, 30(7), 697-704.
- Rodby-Bousquet, E., Ágústsson, A., Jónsdóttir, G., Czuba, T., Johansson, A. C., & Hägglund, G. (2014). Interrater reliability and construct validity of the Posture and Postural Ability Scale in adults with cerebral palsy in supine, prone, sitting and standing positions. Clinical rehabilitation, 28(1), 82-90.
Technical Definition: “The PPAS is designed to assess postural control and asymmetries in people with severe disabilities in four basic body positions; supine and prone lying, sitting and standing…The PPAS is sensitive to identify small asymmetries and deviations at all levels of motor function and is likely to detect asymmetries at an early stage.” (Rodby-Bousquet et al, 2014)
A Practical Application: While one of the main uses of the PPAS is to “ identify small asymmetries and deviations at all levels of motor function” (Rodby-Bousquet et al, 2014), another great use is to promote good alignment while using an adaptive device like a stander or a specialized seat.
For this reason, the Posture and Postural Ability Scale (PPAS) has become one of my favorite tools, especially for clients with complex disabilities. It is a very straightforward tool too! Skim through the article you can reach via the link above, then let’s continue on…
As you can see, you only have to do 2 things:
- Postural Ability is scored as the client’s ability to “stabilize the body segments relative to each other and to the supporting surface” (Rodby-Bousquet et al, 2014) in a 7-point ordinal scale, from 1 (Unplaceable in an aligned posture) to 7 (Able to move in and out of position).
- Yes, it’s that easy, just select 1 Number!
- Posture is then rated as the quality of habitual posture based on 6 descriptors from the sagittal view and 6 descriptors from the frontal view. Yes scores a 1, No scores a 0, for the highest total of 12 points.
- Habitual posture is defined as “the posture customarily adopted by the individual when instructed to sit, stand or lay down in prone or supine as straight as possible or the posture the body assumes when placed as straight as possible in any of these positions and allowed to settle.” (Rodby-Bousquet et al, 2014)
You can test the client, in any or all of these positions you are interested in
- Standing
- Sitting
- Supine
- Prone
Here are some ideas of using the PPAS with assistive devices:
- Comparing postures in different equipment and/or accessories
- You can conduct, say the Sitting version using 2 different seating devices or sets of accessories to determine in which one the client achieves better Posture scores
- Collaborative assessment tool to gain buy-in on consistent use of equipment and/or accessories
- I’ve used this test together with a parent to demonstrate why her child needs the proper back support for improved sitting. I discussed what each of the items means (because some of the terms are jargon-y), then we scored the Posture part together. Boy, did we have a great conversation!
- The child scored a 10 out of 12! And, of course, the parent wanted the perfect score of 12. So we experimented together on various ways to make this happen.
- Then, finally I got buy-in! Because the parent now understand and was able to physically feel why the accessory is needed.
- Checklist to ensure proper positioning each time the client uses equipment.
- Let’s say, you have a student that needs to use a stander every day. Print out a form that can be used like a checklist, then laminate it. Attach it with a string to the back of the stander, and attach an erasable marker with another string next to it.
- Every time the student is placed by the paraeducator on the stander, the paraeducator can check off whether the student is in proper alignment from the front and the side. Again, who does not want a perfect score of 12?!
- Since they’re using an erasable marker, they can wipe it off, then use it every single time the student is utilizing the stander.
- While I usually discourage modifying a standardized test (as it makes it not standardized), when used for the sole purpose of monitoring equipment, it is ok to modify some items based on your client’s needs. Say, the student’s hips should each be abducted 15 degrees while on the stander. Modify the item that says “legs straight in relation to the pelvis” to “hips abducted 15 degrees”
Your Turn
Now it’s your turn! Try out these tools and write in the comments below how they worked out. And write in the comments below other assessment tools that you like to use in selection and implementing the use of adaptive equipment.
Catch the following continuing education courses on assessment tools at Apply EBP:


1 Pingback